![]()
![]()
![]()
![]()
![]()
![]()
![]()
![]()
![]()
![]()
![]()
![]()
![]()
![]()
![]()
![]()
![]()
![]()
![]()
|
|
Potenza S03 Tires on BBS RK Wheels
When it comes to selecting aftermarket wheels, I have always made my choices
based on three primary considerations. First and most importantly,
the wheels must be lightweight. This requirement arises from my "form follows
function" philosophy. Lighter wheels reduce both unsprung weight and rotational
inertia, both of which should be kept to a minimum for best vehicle performance.
All other factors being equal, upgrading to lighter wheels will improve any
vehicle's acceleration, braking, and handling capabilities. This is directly
related to the simple physics of F = MA, or
more precisely t = I * a,
where t represents
total torque, I is
the moment of inertia, and a is
angular acceleration. As you can see, the torque required to achieve any
specific acceleration is directly proportional to the moment of inertia, so if
you increase I by
a factor of x, you must increase the applied torque
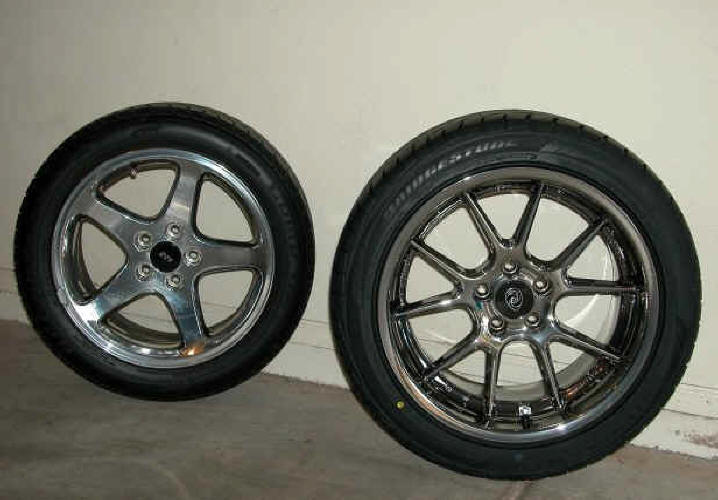
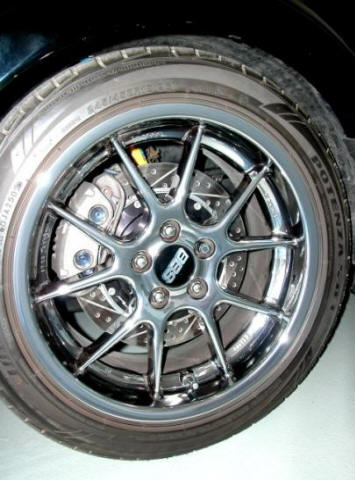
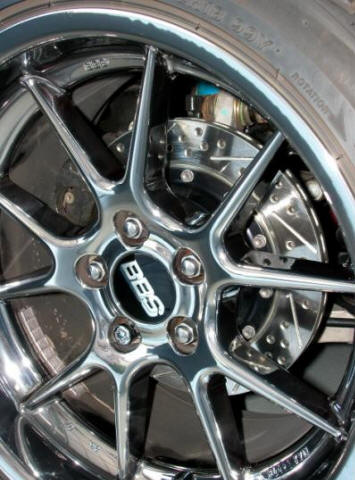
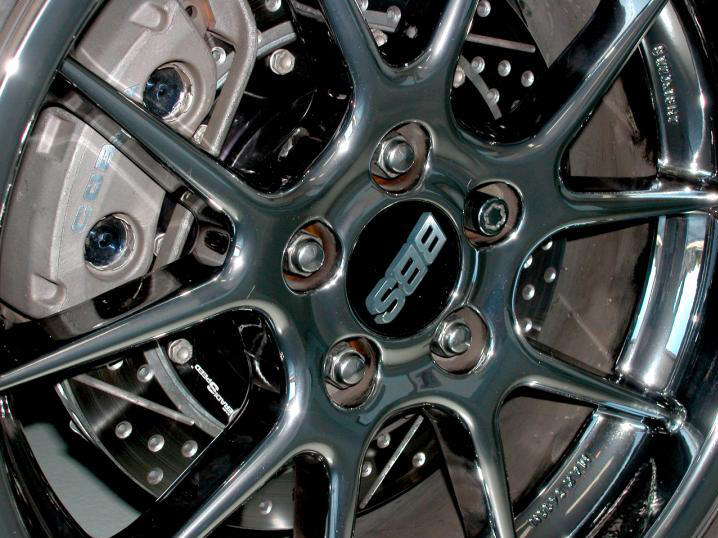
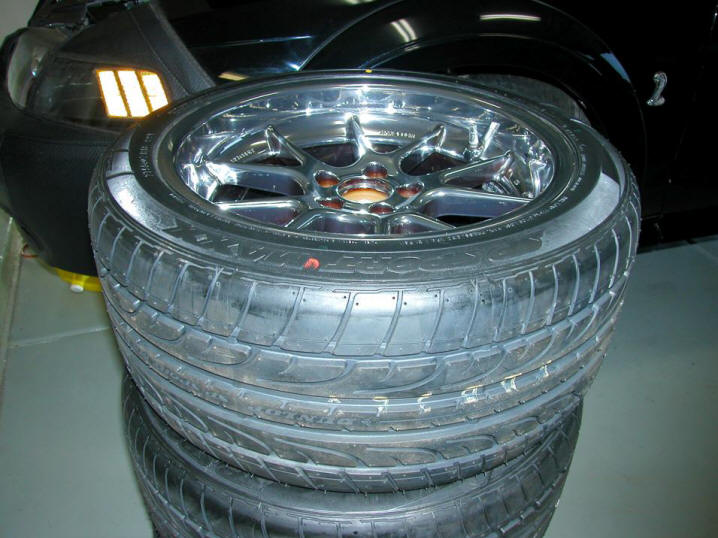
by the same factor. Second, and important to me entirely from a maintenance standpoint, I prefer wheels easy to keep clean. This implies wheels of simple design. Wheels with busy, intricate mesh or spoke patterns and/or wheels with exposed fasteners are much harder to keep looking good than simple, single-piece designs are. Also, unless they are clear-coated, polished wheels require considerably more elbow grease to keep looking good than painted or chrome rims, so I'd never consider a set of bare, polished wheels for one of my vehicles. Third, a set of wheels must be visually appealing to me. I'm not inclined to mount a set of wheels that I think are hideously ostentatious on my car. Editorial Comment: While I realize that wheel selection is a very personal thing, some choices strike me as just plain ridiculous, personal preferences notwithstanding. In particular, I will never understand the fascination with rivets or other fastener doodads around the rims of road wheels. I must confide that I, for one, consider fasteners not only unsightly but also counter-productive from a performance standpoint. Rivets/fasteners look bad, add weight, and make wheels difficult to clean. Most absurd are the faux rivets added to single-piece wheels for purely cosmetic reasons, apparently to make them "look" like more expensive multi-piece designs. How ridiculous is THAT? Okay, what about genuine multi-piece wheels? In my mind, multi-piece arrangements really belong on racecars, not on road cars. Why? Multi-piece wheels were developed to enable racing teams to adjust wheel offsets and replace damaged rims at the track. Those were the sole reasons for multi-piece wheel development. In return for those capabilities, racers accept a modest weight penalty over what the same wheels would weigh as single-piece designs. Furthermore, race teams don't mind that the fasteners are unattractive. For them, the flexibility of a multi-piece wheel is the paramount consideration. On a road car, that flexibility is moot. No one is about to change a bent rim at the side of the road, and every road car will accept only a very narrow range of wheel offsets - too far one way or the other and rubbing issues arise. Multi-piece road wheels also make sense to the manufacturer by reducing inventory overhead, since the offset of any multi-piece wheel can be adjusted to fit a wide range of applications. That's the only advantage of a multi-piece road wheel design, and it's the vendor's advantage, not the consumer's. Nonetheless, fasteners sell wheels to fools with more dollars than sense. In most cases, a multi-piece wheel could be constructed such that the fasteners are installed from the back side and aren't visible when the wheel is mounted on the car, but most aren't. In most cases, the fasteners are installed from the front. Why? Boy-racer poseurs are everywhere. That's why. I laugh every time some nimrod boasts about his 2-piece or 3-piece wheels, because I know he grossly overspent for a set of wheels with compromised performance that look like they're better suited for use on farm equipment, simply because he wants to LOOK like a serious gearhead. Even though the stock '01 Cobra wheels were fairly light at 26 pounds each, I began considering aftermarket replacements as a means of reducing unsprung weight not long after purchasing Taz. Until I first saw the plasma finish BBS RK's, I had been planning on a set of SSR Competition wheels, even though I'm not especially partial to 6-spoke designs. The Competitions were extremely light and would have been easy to maintain. However, the PVD (physical vapor deposition) Plasma Cut finish of the RK's was particularly striking, and this "black chrome" wasn't accompanied by the same weight penalty as conventional chrome. Although the RK's weren't quite as light as the Competitions, they were still considerably lighter than the stock wheels even though they were an inch larger in diameter, weighing in at 19 lbs each for the 18"x8.5" fronts and 20.1 lbs apiece for the 18"x10" rears. Besides, the SSR's weren't available in the staggered widths that I wanted. Finally, although less significantly, the open 5-spoke design of the RK's was arguably better looking. The BBS wheels got the nod. Editorial Comment: Without a doubt, there are those out there in Internet Land who suffered something akin to a severe allergic reaction when they read that I seriously considered JAPANESE wheels for the Cobra. I can almost hear the critical remarks - epithets like, "Those belong on a Honda, not a Mustang," and "Ricer!" I am amused when I consider that many of those same critics think nothing of mounting a set of replica wheels manufactured in CHINA from recycled beer cans on their own cars. I suppose that's okay because those cheap replica wheels "look" like American muscle. Get a clue, fellas. If you simply dislike the specific style of the SSR Competitions, that's one thing. You're certainly entitled to your personal preferences. I'm not a big fan of 6-spoke designs, either. However, if the mere mention of names such as SSR, Enkei, Volk, or Rays causes you to break out in a rash that looks like poison ivy, then get over yourself and get real. The Japanese manufacture some of the highest quality wheels on the market today - as opposed to the cheap knockoffs many rednecks are sporting on their own rides because they LOOK like classic American products, and they're affordable with the money from their paper routes. Time to face reality. Japanese wheels are strong contenders for anybody primarily concerned with quality and performance, so no sense getting your panties in a wad every time you see a set of Rays or Enkei wheels on a Mustang. Since I was migrating from 17" to 18" wheels, I also needed new tires, even though the factory rubber had seen only about 3K miles. (Oh, well.) I decided to also switch to a tire of larger overall diameter in order to raise Taz's belly up off the tarmac a bit. After installing the car's H&R Sport Springs, I had been encountering periodic scraping of the cats and mufflers over broken pavement because of the car's reduced ride height combined with the progressive rate of the springs. I was even forced to avoid most parking lot speed bumps. Having to be constantly vigilant against scraping had considerably reduced the car's fun factor, and I wanted to restore that. I hadn't bought a performance car to granny it around, but rather to drive the way it had been engineered to drive. Taz is never driven in the rain or on wet roads, so excellent dry braking, handling, and steering performance were my primary tire requirements. I also wanted a tire with a "Y" speed rating, because I planned on instilling the Cobra with the ability to attain speeds in excess of what W-rated rubber could handle. Based on owner reviews and comparison tests, I settled on a set of Bridgestone Potenza S03 Pole Position tires, which were available in the sizes I wanted. Hillie bought the wheels and tires for me as my 2002 Christmas / 2003 birthday gifts, and we ordered them as wheel/tire combos from Tire Rack - a pair of 245/45 S03's mounted on 18x8.5 RK's for the front and 18x10 RK's shod with 275/40 S03's for the back. This combination provided four tires of exactly the same overall diameter, but with more section width in the rear for a little better traction under hard acceleration. When they arrived, I was astounded by the finish quality of the wheels. They looked even better in reality than they had looked in the photos, which is almost never the case with wheels (or anything else, for that matter). I was very pleased with my choice (and Hillie's gift). TECH TIP: When running different width tires F/R on an ABS-equipped vehicle, be sure to keep their overall diameters reasonably close to one another. The Cobra's ABS will tolerate up to about 3% difference in tire diameters before the system begins to complain and implement corrective actions that negatively impact performance. Unlike the Traction Control system, the ABS cannot be disabled with the push of a button, so you'll be unable to defeat the hobble if your ABS module imposes one. You can use the Tire & Drivetrain Calculators on this site's Tech Docs page to determine the outside diameters of your tires. TECH TIP: For optimum performance and safety, wheels and tires should always be matched by width. As a rule of thumb, the correct rim for any tire is one that is at least 80% as wide, flange-to-flange as the tire's specified section width but no wider than its section width. Every modern tire's section width is listed in millimeters as the first three digits of the tire's specification. To convert this metric value to inches, just divide it by 25.4 (the approximate number of millimeters per inch). The tire will best fit a wheel at least 80% as wide, but no wider than the number you calculate. Always match your tires and rims this way. The shoulders of tires stretched over rims that are too wide will curl in toward the middle of the tire, resulting in less tread contacting the road, increased tire wear, and a harsher ride. Much more importantly, centrifugal action can actually pull the tire beads away from the bead seats on the rims at higher speeds, resulting in death by stupidity. Conversely, a tire mounted on a rim that is too narrow will provide a soft ride, but will also result in an inadequate bead seal and force the tread into a convex profile, leading to poor steering control, compromised handling, and accelerated tread wear. Both extremes are dangerous. If you're a victim of progressive education, and find the math above a little too challenging, you can rely on the tables provided by some vendors. Many wheel and tire vendors don't offer specific information on width-matching tires to wheels, but Tire Rack does. You can find the correct rim width range for any tire on the company's website by selecting the "Specs" tab on the tire's page. Then, just locate your tire size in the left column and read across to the "Rim Width Range" column to find the acceptable rim widths for that tire. It doesn't get any simpler. If you choose to ignore this guideline and mount your tires on rims outside the specified range, you'll probably experience some difficulty locating an outfit willing to perform the work, due to liability issues. Also, the only shops willing to accommodate such wishes typically reside at the bottom of the food chain, so you'll probably get what you deserve. Below is a photo of a factory wheel and tire assembly next to one of the BBS/Bridgestone combinations. (Obviously, the actual size difference is nowhere near as large as it appears in this photo. The new wheel/tire combo is standing in the foreground, which exaggerates the difference.) The folks at Tire Rack mistakenly shipped the wheels with Panoz center caps, one of which can be seen on the BBS wheel in this photo, but the company overnighted me a set of the correct center caps as soon as I notified them of their mistake.
I was delighted to discover that my expectation regarding slightly taller tires had been correct. Raising the car up 1/2" by adding an inch to each tire's overall diameter eliminated the intermittent scraping, so I stopped cringing every time I needed to negotiate broken or uneven pavement, culverts, and railroad crossings. Even better, speed bumps were no longer impassible obstacles to be avoided. And as an added bonus, the larger diameter tires filled the gaping fender wells much better than the factory rubber had. NOTE: If you are considering the installation of larger diameter tires on your own lowered car, a word of caution is in order. You should first be certain that the offsets of your wheels are close to those of the factory wheels. Otherwise, you might run into rubbing issues. The offsets of my RK's are just about spot on, so even though Taz sits fairly low, I have not experienced any rubbing with my inch larger diameter tires. However, a few individuals running setups with offsets that pushed their wheels and tires further outward have reported intermittent rubbing when their suspensions are jounced. Although this rubbing can be eliminated by either raising the suspension back up slightly or switching to wheels with offsets closer to OEM, you may want to avoid the problem altogether. Editorial Comment: Automotive artists love to sketch cars with wheels barely small enough to stuff inside the fenders and tires with absurdly short aspect ratios. This has been true since the invention of the pneumatic tire. And, until we as a society had been sufficiently dumbed down, just about everyone over the age of six realized this was merely an expression of artistic license and a means of endowing automotive sketches with modestly cartoonish traits. We all recognized that there was no allowance for suspension travel, and that the vestigial sidewalls would have resulted in unbearably brutal ride qualities for those vehicles. Nowadays, however, we see an ever-increasing assortment of idiots attempting to emulate this absurd cartoon-car look, because the Ruling Class has succeeded over the past quarter-century in whacking about a point per year off the average plebeian's IQ, and common sense has fallen by the wayside. The most ridiculous, of course, are the trucks and SUV's sporting absurdly huge wheels shod with rubber band tires. Time for a reality check, folks. They're TRUCKS and UTILITY vehicles! HELLO! Not only does this sort of folly dramatically compromise their ride and design capabilities, but dressing a sow in an Armani suit buys you nothing but a well-dressed pig. Trust me, "stylish truck" is a universal oxymoron. I realize we're a little off topic here, since this site isn't about trucks. Or pigs. Nonetheless, all vehicles with enormously oversized wheels look for all the world like garish comic book refugees owned by people who understand the phrase "good taste" only in relation to food. Let's face it: an SN95 or New Edge Mustang looks completely ridiculous sporting wheels larger than 19's. Furthermore, anyone who has ridden in a vehicle with ultra-low profile tires can confirm that they are real kidney busters over anything but glass-smooth roadways. Invariably, the lame justification that I hear offered for mounting 20" monstrosities on a New Edge 'Stang is a desire to "close the gap" in the fender well. However, when I see that the overall diameter of the wheel/tire combo hasn't increased a single millimeter, I realize that's complete BUNK! Even worse, a larger wheel actually exaggerates the gap. As any professional automotive stylist will tell you, given the same overall diameter, the wheel/tire combo with the larger diameter wheel and shorter sidewall tire will emphasize the space around it MORE than the combo with a smaller diameter wheel and taller tire. That's just the way the visual processing centers of our brains work, so don't go around peddling that "close the gap" nonsense unless you've installed larger diameter tires, because THAT'S the only way you're going to accomplish it.
2005 Brake System Upgrades
After supercharging the Cobra, I thought it might be a good idea to bump up Taz’s braking ability in order to bring it more in line with his accelerative potential. In other words, I thought he should be able to stop as well as he went. Since Ford had delivered the factory-blown Terminator Cobras with the same braking components as the ‘99/’01 Cobras, it was apparent that Taz’s brakes were already reasonably stout for a Dearborn assembly line car. Still, I wanted more. Editorial Comment: You've probably heard the old cliché that brakes don't stop cars - tires do. Well, that's true, but only up to a point. Sure, Pa Kettle probably isn't going to haul down his Lincoln Town Car any more quickly in a panic stop situation on a public road with mondo brakes than he can with his OEM's. His stopping distance will be limited by the coefficient of friction between his all-season radials and the road surface. On the other hand, how well do you think Pa's OEM brake system is going to hold up to a few hot laps at his local road course? Chances are he'd be in for a bit of agricultural driving fairly quickly, because his brakes would have cashed in their chips. My point is that resilience in the face of sustained abuse is the primary reason for looking into better brakes. There's plenty of room for improvement in most OEM brake systems with respect to everything from fluid to pad and rotor composition, and the 1999 - 2004 Cobra brake system is no exception. Even if you don't track your car, objective testing confirms that better brake components will reduce your stopping distances, particularly if you have sticky tires, and they'll hold up much better when asked to perform above and beyond the call of duty. Better brakes are also less "grabby" and more linear. They're easier to modulate, so they are less prone to premature lockup. If your car is equipped with ABS, the anti-lock system isn't called upon quite so early to intervene in a panic situation. Net result: shorter stopping distances. Don't take my word for the improvement that better brake system components can make. Watch THIS VIDEO ( <-- clicky link) from DBA that demonstrates the improvement achieved with one of their kits. Although I briefly considered switching Taz over to a silicone-based DOT5 brake fluid as part of his brake upgrade project, I quickly discarded that notion after reading of all the DOT5-related issues that owners were experiencing. That left me with DOT4, and my choice of a DOT4 fluid was easy. It had to be Motul RBF600. Since this 100% synthetic brake fluid was developed specifically to withstand the rigors of racing, its performance is genuinely phenomenal. With a dry boiling point of nearly 600F degrees and a wet BP of 420F, the thermal resistance of this formula is far superior to just about any other DOT4 fluid on the market. It's pricey, but well worth the money. Of course, if you want to go all in, Motul also offers an RBF660 formula with an even higher BP for considerably more money. I wanted the Brembo calipers that came on the purpose-built 2000 Cobra R for the front of the car. Even though Taz's brake system was no lightweight setup, the 2000 Cobra R brakes were demonstrably better. The rear Cobra R brakes differed from those of all garden variety ’99–’04 Cobras only with respect to their pad composition, but the front brakes were a different story. I really lusted after those beautiful 4-piston Brembo calipers, so I bought a Ford Racing 2000 Cobra R front brake upgrade kit, which included a pair of slotted Brembo rotors and a pair of Goodridge braided stainless lines in addition to the calipers. Installation of the upgrade kit was a snap, and I had the passenger side installed in no time. Unfortunately, the '00R calipers weren't compatible with my BBS RK wheels. As soon as I tried test fitting my passenger side wheel, I realized I had a serious problem. The wheel's spokes would not clear the bulging caliper. Not even close. My first inclination was to push the wheels out far enough with spacers to gain the clearance I needed for the calipers, but my measurements indicated a 38mm spacer requirement. Minimum! For those of you who don’t do metric, that equates to just about 1.5 inches. That workaround wasn’t acceptable from either a performance or an aesthetic standpoint, and swapping out my BBS RK’s for different wheels that would clear the calipers wasn't an option, either. The calipers had to go. Although I managed to minimize the financial impact of my aborted initial brake upgrade path by parting out the Cobra R brake kit's components, the old wallet still took a bit of a hit. That hurt, but even worse, I now had to formulate an alternative brake upgrade solution. What to do? Well, I could still improve the car’s stopping performance by upgrading the pads and rotors, even if I couldn’t find stouter calipers that would fit. A set of braided stainless brake lines would also help. Time for a little more research. I ended up selecting Baer Eradispeed+ rotors for all four corners. These are 2-piece units, consisting of billet aluminum center hats affixed with National Aerospace Standards stainless fasteners to high strength steel alloy rotor rings. To prevent rust formation outside their fire paths, the rotor rings are zinc washed. Each ring is also vented, slotted, and cross-drilled to maximize bite and minimize fade. As a bonus, each Eradispeed+ rotor assembly weighs significantly less than its OEM counterpart (an average of 3 lbs each, front and back, for a total savings of roughly 12 pounds). This reduction in unsprung rotational mass paid off in tangibly improved acceleration and handling, as well as in braking performance. Editorial Comment: Charter members of the Flat Earth Society will attempt to persuade you that rotors must be HEAVY to provide good braking performance, because you need all that good old cast iron to dissipate the heat generated by pad friction. Nonsense! Which dissipates heat better, cast iron or aluminum? (For the knuckle draggers in our audience, the correct answer is aluminum.) The aluminum hats of 2-piece rotors do a much better job of pulling heat away from the friction surfaces than any single-piece cast iron rotors possibly can. Empirical data collected from aluminum alloys indicate thermal conductivities between 120 and 180 W / mK (Watts per meter*Kelvin), somewhat less than pure aluminum, which weighs in at 237, but still respectable. By comparison, stainless steel variations range from about 12 to 45, and iron is even lower. Get the picture? Iron SUCKS for heat dissipation. Iron also adds unnecessary weight to the vehicle, which saps fuel economy, and all that extra weight is both unsprung and rotational, the worst type imaginable from a performance perspective. In fact, the only reasons that iron is used at all for rotor rings are that it's cheap and it's adequate at withstanding both pad abrasion and the heat generated by extended braking episodes. However, as the price of ceramic discs is gradually eroded by the economy of scale, ceramic will eventually replace iron as the rotor material of choice. Why? Ceramic material is lighter and dissipates heat even better than aluminum. As far as pad choice was concerned, I quickly selected a set of Ford Racing 2000 Cobra R pads for the rear. After all, they were good enough for the Cobra R, which had been engineered as a dedicated track car. But I was undecided about the front pads until I discovered that Brembo had released a line of "Sport" pads employing a new friction material that Brembo called FM1000. This material, developed for use in high performance applications in collaboration with brake pad manufacturer Ferodo, was designed to provide a very high coefficient of friction across an extremely wide temperature range while still retaining low noise and low dust characteristics. I also added Russell brake hoses with braided steel jackets and Russell Speed Bleeder caliper bleed valves to all four corners to supplement Taz’s brake system upgrades. The braided stainless hoses would promote a more solid pedal by minimizing hose expansion during hard braking, and the Speed Bleeders would enable me to quickly and easily bleed the brake system without an assistant and without any undue drama. 2009 UPDATE: When I installed my Russell braided stainless steel brake hoses, I was still running the OEM rear half-shafts, and clearance between the hoses and the outer CV boots joints hadn't been an issue. After replacing the OEM axles with DSS Level-5 half-shafts, I neglected to check for potential interference between the already installed Russell hoses and the new axle shafts, which were equipped with much larger outer CV boots. This was a mistake. Eventually, the braided line rubbed through the outer boot of the driver side axle, requiring the CV joint to be re-booted and repacked with grease. (See the Drivetrain Upgrades page of this site for details.) To minimize the likelihood of this situation reoccurring, I replaced both of the Russell brake hoses in the rear with a braided pair from Maximum Motorsports. The MM hoses are significantly shorter, which reduces the interference potential. The Russell hoses on the front brakes remain in place because I have not experienced an issue of any sort with those. I shot several photos while working on the 2005 brake upgrade project, but I ... um ... somehow misplaced them afterward. Instead, here are a few shots of the Eradispeed+ rotors as they looked after a few hundred miles of use.
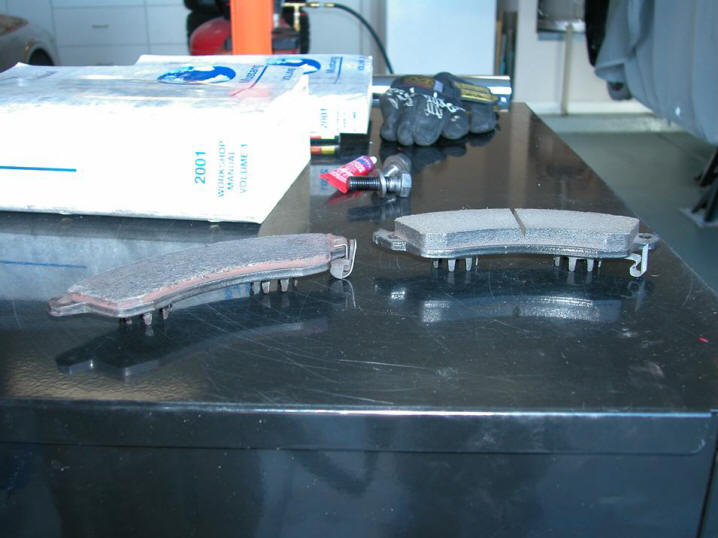
After living with the Brembo FM1000 pads for quite some time, I feel reasonably confident in reporting that Brembo achieved almost all of its stated design objectives with its FM1000 friction material. These pads do produce mad grip, and are completely silent. Unfortunately, they also coat the wheels with prodigious quantities of reddish dust during any spirited driving. Well, if I must live with pads that score only two out of three, I'd rather live with the dust than with either noisy pads or poor performance. Another aspect of the FM1000 pads worth mentioning is that they wear quickly, but leave the rotors relatively unscathed. I suppose it just comes down to which you'd rather replace more often. My first set of FM1000 pads appeared ready for replacement after just a few thousand miles and a couple of track events. When I pulled my pads for inspection, I was surprised to find that all my front pads looked like the one on the left in the photo below. (The pad on the right is a new Brembo Sport.)
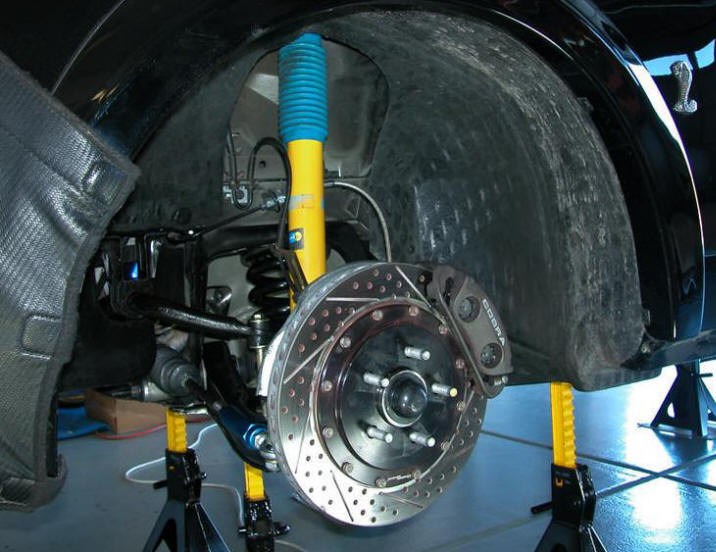
I've always maintained that everything automotive involves tradeoffs, and the Brembo FM1000 pads have demonstrated themselves to be no exception. They stop the car as if it has dropped anchor, and they're library quiet, so they do an excellent job at what brakes are designed to do without being obnoxious about it. Furthermore, they're easy on the rotors (something most performance pads, including my Ford Racing rear pads, were not). However, there's a flip side to this coin: fast pad wear and copious dust. Nevertheless, when I replaced my first set of worn FM1000's, I decided that, at least for me, their advantages outweighed their disadvantages, so I installed an identical set of fresh pads. I like them so much that I stocked up the Cobra's parts shelf with multiple fresh sets. During the car's 2006/2007 round of suspension upgrades, I scored a couple decent brake photos. Here's a shot of the left front rotor just before I buttoned everything up. At this point, the rotor has about five thousand miles on it. The reddish color you can see in various places is FM1000 brake dust. Funky looking stuff, isn't it?
And here's the left rear rotor with the same mileage. You can see some scoring on this one, courtesy of the Ford Racing 2000 Cobra R pads, which tend to be much harder on rotors than the Brembo Sport pads. Next time around, I'll be installing the Satisfied Motorsports Gran Sport pads offered by Tire Rack. Hopefully, they'll be a little more rotor-friendly.
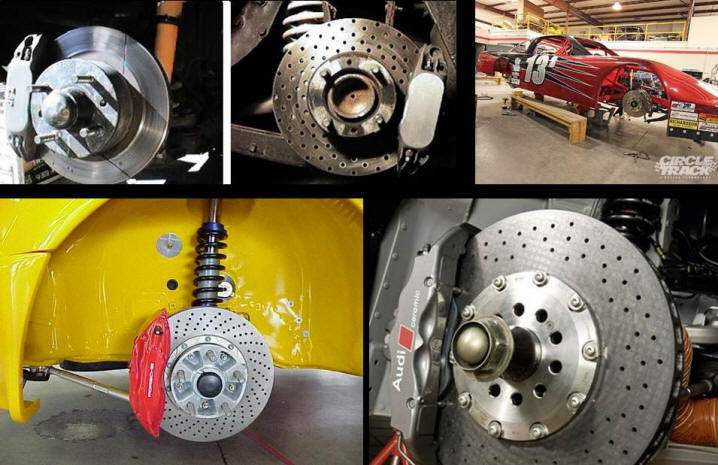
TECH TIP: Slotted and slotted/drilled rotors are directional parts. If you install such rotors on your vehicle, try to at least APPEAR as if you know what you're doing by installing them correctly. Brake manufacturers advise that, for vented rotors with directional internal vanes, you should orient your rotors according to the direction of the vanes to achieve maximum rotor cooling. I agree. The vents in straight-vaned and pillar designs aren't directional, so there's no air pumping advantage either way. For those, orienting the rotors such that the ends of the slots nearest the outer edges of the rotor faces contact the pads first will also minimize debris buildup in the calipers, keeping brake temps lower, and prolonging caliper life. Editorial Comment: The same Flat Earth Society mentioned earlier on this page also maintains that cross-drilled rotors will invariably develop stress cracks, particularly if the car sees any track time. Well, maybe and maybe not. It's just possible that any propensity for cracking may depend on WHOSE cross-drilled rotors you are running. The Eradispeed+ rotors pictured above had already been subjected to multiple autocross and road course events, including lots of hard braking into Firebird Raceway's Turn 1 at better than 155 mph and plenty of usage through the twisties along the back side of the track. No cracks. Imagine that. These rotors had been on the car for some time and were still in great shape. Sure, if you buy cheap, poor quality cross-drilled rotors, they'll probably crack in short order, so don't buy junk rotors. Cheap rotors aren't manufactured from the same quality alloys that better rotors are, and their holes typically aren't chamfered, leading to premature stress cracks. Stay away from them! The last thing we need is another nimrod who bought junk rotors embarking on a crusade to rescue the rest of us from the evils of cross-drilled designs when his real problem was, in fact, entirely due to a substandard product, rather than an intrinsic design flaw. Here's another myth that needs busting: the notion that blank rotors can produce stopping distances as short as drilled rotors. No, they can't. Period. I've seen the hard numbers generated by objective comparison testing, and those numbers make the performance differences indisputable. Fact is, a drilled rotor presents a more aggressive surface for the pads to work against. This is exactly WHY drilled rotors wear down pads faster than blanks will. The aggressive surface produces greater friction, which results in shorter stops. It's just simple physics, folks, but it seems to have escaped the Flat Earthers. Slotting a rotor will not, by itself, shorten stopping distances during normal driving, but slotting does improve a rotor's degassing capabilities over a blank's, which can help during competitive driving. Depending on your choice of pads and your driving style, this may or may not be of any real benefit to you. Nevertheless, you WILL realize shorter stopping distances with drilled/slotted rotors compared to blanks. (That's why high-performance exotics like Ferrari, Lamborghini, and Porsche, not to mention ALL the killer sport bikes on the market, are delivered with such rotors.) I am really weary of the negative light in which various Internet Luddites have cast slotted and drilled rotors. It's ridiculous, especially considering how many racecars of various types use these rotors. Anyway, if a picture is worth a thousand words, here are several thousand words for your consideration ...
Yes, Virginia, ALL the above rotors are installed on REAL professional racecars. The kind at which sponsors throw mass quantities of advertising money. The rotors in the top row of the composite all belong to NASCAR and Circle Track teams, and those at the bottom are mounted on Formula GT3 cars. Such rotors are the rule, not the exception, on these racecars, as you can easily verify, since there are numerous photos and references to such racing brakes plastered all over the Internet. Obviously, these brakes weren't installed for their bling factor. They were installed because they WORK better than blanks. DUH! During a heated debate with one of the aforementioned Internet Luddites, I felt compelled to produce some objective testing results supporting my position that drilled/slotted rotors do, indeed, offer performance advantages over conventional blanks. With apologies to the original author for not providing his name, here is a direct quote from an SAE engineer: "There are many claims as to the benefits of drilled vs slotted rotors on stopping power. This guide is intended to provide some facts about drilled and slotted rotors. As a member of the SAE (Society of Automotive Engineers), I was pleased to see a paper "The Effect of Rotor Crossdrilling on Brake Performance" by two GM engineers published in 2006. They examined three vehicle platforms with cross-drilled rotors vs standard rotors to measure convection cooling capability, fade characteristics, wet braking, pedal feel and lining wear. The result is summarized as follows:
The authors also reported that drilled rotors prevent pad resin glazing on the rotor. So we now have solid evidence that drilled rotors have benefits over standard rotors. However, I have not found any published paper to show how slots affect brake output. So I reviewed inertial dynamometer tests using ISO NWI 26867 from Link Testing in Detroit with slotted rotors vs standard rotors. The results showed no significant difference in the coefficient of friction during the fade sections, hot stop section or pedal sensitivity portion of the test. My hypothesis is that slotted rotors do not contribute to rotor cooling whereas drilled rotors improve convection heat transfer to cool rotors and reduce brake fade. I should also point out that the pad lining wear for the slotted rotor was very severe during the test, i.e. the pad was chewed up over 20% more than the lining with stock rotors. While I believe that slots will help remove gas and debris from under the pad, I am not sure that this has a significant effect on brake torque for normal street driving. Perhaps the effect of slotted rotors is more significant on the race track, and conversely, I believe that drilled rotors are better for street and highway driving. For most drivers, I recommend drilled rotors over slotted rotors, and this conclusion is supported by the fact that Corvette, Ford GT, Porsche, Mercedes and BMW come with OEM drilled rotors." I subsequently downloaded and read the referenced SAE technical paper for myself. If you like, you can do the same for a nominal fee. Just browse to THIS Web page. After reviewing the paper, I wrote a detailed synopsis. Here's a link to my synopsis in PDF format: Synopsis of SAE Tech Paper 2006-01-0691 The only real downside to cross-drilling noted by the paper's authors, Antanaitis and Rifici, was accelerated brake component wear. Since there are mountains of empirical data out there, including my own, indicating accelerated wear, most have been aware of this for quite some time. However, I personally consider it a reasonable tradeoff for improved braking performance. Brake components are, after all, consumables, and an accelerated wear rate is to be expected with enhanced levels of performance.
Dunlop SP Sport MAXX Tires
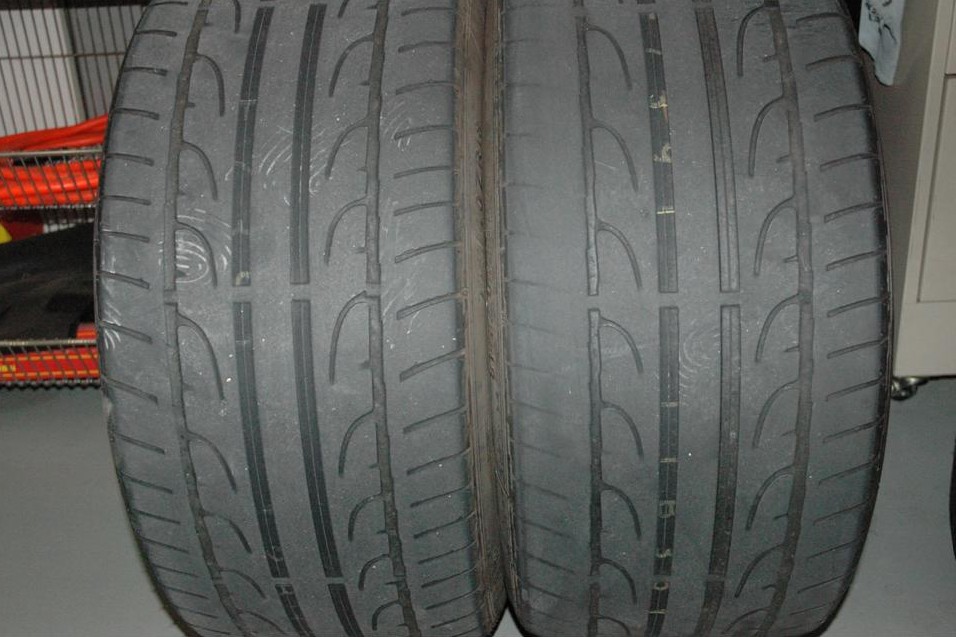
As we are all aware, tires are consumables, just like brake pads and discs, and my Bridgestone Potenzas were no exception. Here is a shot of the left front tire after about 10K miles and a few track events. (I'll bet you can tell I had been running a fair amount of negative camber, can't you?) As you can see, the Potenzas were in dire need of replacement.
The S03's had been excellent performers at the expense of some ride comfort. They had been designed to trade away a bit of road isolation in favor of improved steering response and handling grip. Since Taz was a performance vehicle and strictly a weekend warrior, I had been very satisfied with my S03's. By the same token, tire technology had advanced significantly in the intervening years between their purchase and the advent of their retirement (pardon the pun). I figured it was time to try one of the newer offerings, so I opted for a set of Dunlop SP Sport MAXX rubber in the same sizes that I had been running with the Bridgestones.
The tread design of the SP Sport Maxx tires is very similar to the old S03's, and considering how well the Potenzas had performed, I considered that a good thing. Additionally, the Dunlops average about three pounds apiece lighter than the Bridestones, which is always a good thing from a performance standpoint. As for grip, steering response, and road isolation, it would be unfair to compare any new tires to a set of old, beat carcasses. All I will offer in the way of a subjective evaluation is that I'm very pleased with every aspect of the performance of these new Dunlops. TECH TIP: Given the same weight, larger diameter wheels will have a higher moment of inertia (rotational mass) than smaller diameter wheels. However, the largest contributor by far to the polar moment of any wheel/tire assembly will be the tire. The tread area of the tire, with its heavy belts and thick rubber, will contribute not only the highest percentage of the assembly's static weight, but its overall diameter will be the determining factor in the assembly's angular moment of inertia. Therefore, from a handling standpoint, lightweight tires are just as important as lightweight wheels, if not more so. 2009 UPDATE: By mid-2009, I had determined that the Dunlops were equal to or better than the Bridgestones they had replaced in every respect but one: tread life. In fact, the rear tires were worn down perilously close to their wear bars after only about 6K miles of use. However, this use did include a few open track events, so I suppose I got pretty much what I had bargained for.
Sport MAXX Redux
In 2009, with Taz's sneakers nearing the end of their service lives, I began casually researching various newer offerings. It appeared that comparable replacements in the same sizes were going to cost me at least a grand until Tire Rack, in conjunction with Dunlop, offered a smokin' deal on some new old stock SP Sport Maxx tires. A super deal, in fact. Even though I didn't need the tires quite yet, I had been so completely satisfied with the performance aspects of my old Dunlops - let's disregard the mileage issue - that I jumped on the deal. I banked the new Dunlops in my climate controlled storage unit against the day when the old ones would require replacement. Mid January 2010, that day arrived. In truth, the tires should have been replaced months before they actually were, but I pushed them for every mile I could squeeze out of them, and when they finally came off, the rears were well down into the wear bars. In fact, their tread was so thin that it almost looked painted on, and I was lucky that I hadn't been nailed for an equipment violation. You can clearly see this in the photo below of the rears after I removed them from the car. As you can also see, I had been running a tad too much negative camber on the driver side rear (tire at the right in the photo). This has since been corrected.
Interestingly, my first set of Sport Maxx tires had been produced in Germany, but the second set was manufactured by Dunlop in Japan. After running them for about 2500 miles, I can confidently report that they perform essentially the same on the street. Their ride feels a bit softer, but that probably has more to do with their greater tread depth than anything else. If/when I get this set to the road course, too much time will have already elapsed for me to offer an accurate comparison between them and the German Dunlops, but I will at least try to offer a subjective evaluation as to how they feel.
2011 Brake System Refresh & Ductwork Install
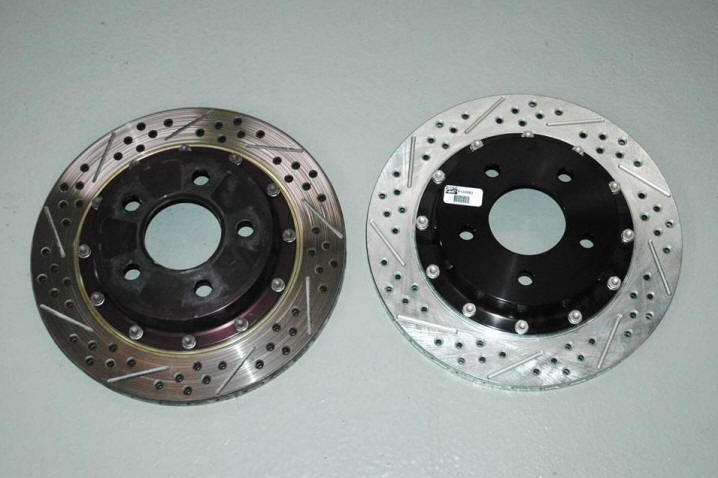
Taz was in real need of a brake system refresh by early 2011. I hadn't performed a pad or fluid change since early 2007, and I had been running the same Eradispeed+ rotors since 2005. After six years and a number of track events, those rotors were finally ready to move on to that big road course in the sky. They hadn't seen that many miles, but they had been used hard on the street as well as on the track. I had asked Santa to bring me fresh front and rear rotor sets for Christmas 2009 and Santa had been kind enough to oblige, but I decided to stash the replacements for installation at a later time. I hadn't been back to the road course since a rule change in 2008 requiring every ragtop in my club's Performance Driving Program to run top-up unless equipped with a roll bar, and I hadn't been driving the car that hard on the street - or even driving it much at all - for some time, so the wear rate of the brake components had subsided considerably. (Just staying away from the track certainly did wonders all by itself to extend the service lives of the Cobra's brake parts.) By 2011, however, Ta's brake fluid was beginning to age out and the front pads had worn down quite a bit, so I decided to replace the works. I had been preparing for this system refresh for about 18 months, so I already had everything I needed on hand. I was good to go on the rotors, and I had enough Motul RBF600 to perform a complete system flush. Also, I had cashed in on a couple outstanding sales on Brembo Sport front pads, so I had stockpiled enough sets of those to last me the next 20 years, and I had picked up some Satisfied Motorsports Gran Sport GS6 pads to replace the Ford Racing pads in the back calipers. All that remained to be added were my time and effort. I started with the rear brakes because I wanted to tackle the toughest end first, and on the Cobra that is most definitely the rear. I think I honestly prefer enduring root canal work to reseating those stubborn Varga pistons. Despite my having a very good set of Lisle brake caliper service tools, those nasty Varga calipers always fight me something fierce. Consequently, replacing their pads invariably turns into a war of attrition. I wasn't swapping out the back pads because they were worn. In fact, the Ford Racing pads were still practically as thick as the new Gran Sport GS6 pads with which I was replacing them. I was merely hoping to save the new rotors from a fate similar to that which had befallen the old ones. The Ford Racing '00R pads use a friction compound that is extremely aggressive, but also very hard, so they tend to wear rotors down quickly while sparing themselves. Now, wear is one thing. Wear is to be expected, but there's no excuse for scoring, and the '00R pads had also produced a lot of rotor scoring. The photo below is a shot of one of the old back rotors next to its replacement. As you can see, the Ford Racing pad has badly scored the old rotor. In this respect, the Ford Racing pads were unacceptable, so it was time to try something different. Hopefully, the Gran Sport GS6 pads would prove a bit more rotor friendly.
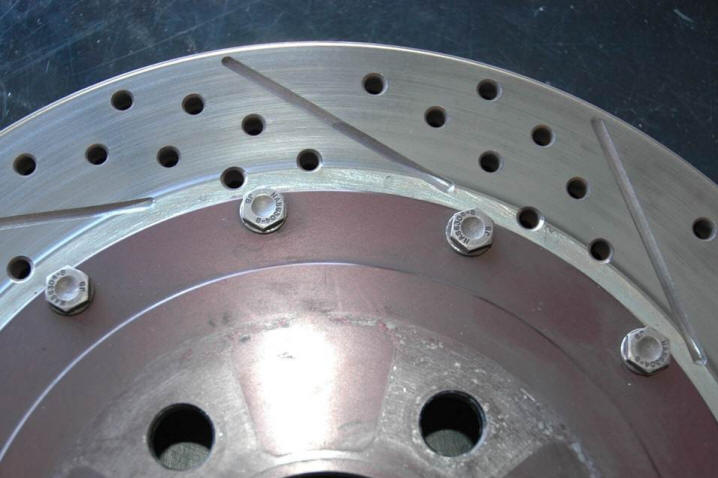
2013 UPDATE: After running the GS6 pads for a couple years, I am happy to report that my back rotors are wearing quite smoothly. No rotor scoring at all. The pads produce slightly more dust than the FRPP pads that preceded them, but the dust is light gray in color, which blends well with my wheels. TECH TIP: If you decide to try the GS6 pads and you run into difficulty getting your calipers to clear your rotors during reassembly, as I did, remove the clip-on sheet metal trim plates from the pads. Even with the caliper pistons fully retracted, I was unable to make my calipers clear my rotors until I did so. (Yes, I had the notches in the piston faces correctly aligned with the pegs on the pads.) Refer to the photo below for a visual of the plates to which I am referring. (The plates on the left in that photo have disc brake grease on them, because I had left them on the pads when I tried reinstalling the first caliper and realized they had to go.) As far as I can discern, these plates serve no purpose whatsoever, other than to dress up the pads' appearance, and in addition to creating installation difficulties, they would probably contribute to brake noise if left in place. Neither the OEM nor the Ford Racing pads were equipped with such trim plates, so save yourself some aggravation and pull them off before you waste time unnecessarily fighting the caliper, as I did. The plates will easily pop right off. Just do it.
Here's a shot of the right rear after I finally had everything buttoned up. Without those pesky trim plates.
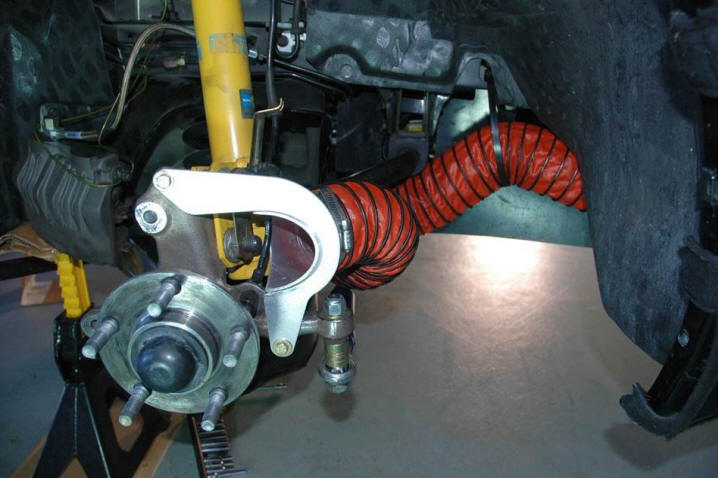
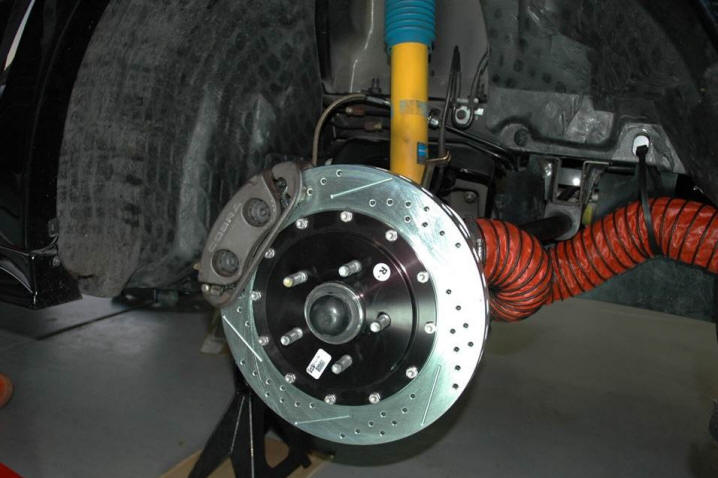
In addition to freshening up the consumables, I decided it was time to get off my ass and install the front brake cooling kit that I had picked up from Quantum Motorsports several months earlier. I had bought this kit primarily for its potential track benefits, and had patently ignored it after I quit driving the road course due the aforementioned new club regulation requiring PDP ragtops without roll bars to run top-up. But since I was pulling the rotors, anyway, I figured I'd go ahead and install the cooling kit. Unlike many of the more affordable brake cooling kits, which came with 300-degree hoses, the Super Touring kit from Quantum included 600-degree hoses. This kit also provided 6061-T6 backing plates with TIG welded hose ducts that had been properly engineered to direct cooling air across a broad rotor swath and into the hub area. You can see both the backing plate, with which I have replaced the OEM dust shield, and the high-temp hose in the photo below. The other end of the hose is attached to the rear lip of the brake duct moulded into the car's front fascia.
TECH TIP: The Quantum Motorsports kit consists of high-quality components, but if you install one of these kits on an ABS-equipped vehicle, you may notice that your ABS sensor cables rub against the hose ducts. No problem. Just mark the points of contact and notch the brackets where the contact occurs. In the photo below, you can see the notch I created in my driver side bracket. I also wrapped the ABS cables with Stretch & Seal silicone tape in those contact areas and secured the cables to the brackets with black silicone seal adhesive to avoid abrasion.
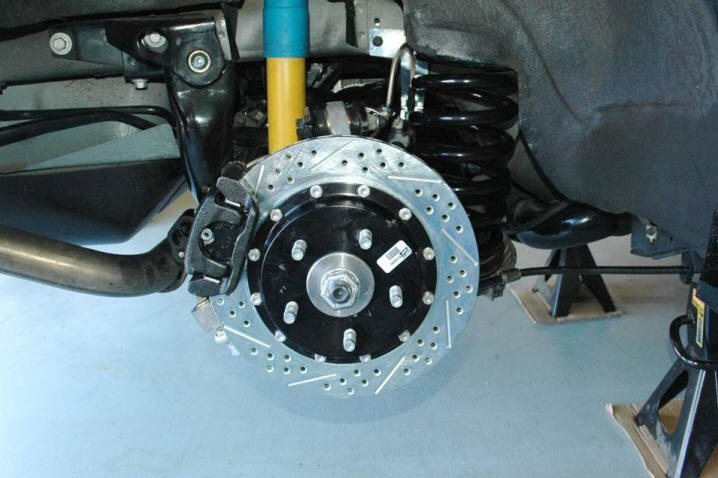
Here's a shot of the way the passenger side brake looked after installation of the new rotor and pads, ready for reinstallation of the wheel/tire assembly.
The reason I stayed with the Eradispeed+ rotors, rather than trying something else in 2011, was that I had never ceased to be amazed by the level of performance and reliability that the old rotors had provided throughout their entire service lives. No point in looking for a better rotor - I doubt there's anything more capable out there short of the high-dollar carbon/ceramic offerings. As for stress cracks, the old rotors never developed a single one. Here's a close-up of a section of the old LF rotor for reference.
Still not a stress crack anywhere to be seen, is there? Nope. And there's not a single crack anywhere else on the rotor, either. Although the disc is visibly thinner within its fire path then outside it, there isn't any cracking. Eventually, I will send the four worn rotors back to Baer for ring replacements. That should save me a couple hundred bucks compared to the cost of complete new rotors. Come to think of it, I may be able to just drive over to the Baer factory and have the rings replaced while I wait, since the Baer company is local to me. Either way, I'll have fresh rotors ready to roll when I need them. All of you Luddites who are still running single piece cast iron blanks need to wake up and smell the coffee. Really. Or maybe not. Maybe you're already getting exactly the braking performance you deserve.
Michelin Pilot Super Sport Tires
In 2014, it was once again time to fit Taz with fresh sneakers. Michelin had released the Pilot Super Sport as company's premier street performance tire, and they had been garnishing high marks from driving enthusiasts everywhere, so I opted for a set of those. I had previously been running 245/45-18's in front and 275/40's in the back, but I decided on shorter, wider 255/40-18 front tires and 265/40-18 back tires. I had already swapped out the progressive-rate springs for a more suitable linear-rate set, so scraping due to the slight additional drop wouldn't be an issue. Also, the FRPP Speedometer Recalibrator that I had previously installed enabled me to quickly adjust Taz's odometer to the new rear tire diameter. (See HERE for Recalibrator details.) Amusingly, the section width of the new rear Michelins was narrower than the old Dunlops, but their contact patch was actually wider due to their squared shoulders.
Those who can interpret tire sizes will realize that, with the same aspect ratio and a 10 millimeter wider section width, the rear tires are slightly taller than the fronts. The actual difference works out to only 0.3", which isn't enough to anger the car's traction control system. That would require at least a 3% difference, which would be more than twice as much. As you can see in the pics below of the tires installed on the Cobra, the difference in diameters is visually imperceptable (front on the left, rear on right).
The PSS is manufactured with an asymmetric design molded of Michelin's Bi-Compound tread rubber featuring a Le Mans-inspired dry compound outboard side-by-side with the latest generation of wet compound inboard. The low-void outboard shoulder features a track-type compound to withstand the stresses of high performance cornering while the notched center ribs and inboard shoulder feature a compound designed for superior performance at very high speeds and in wet conditions. To reduce unsprung weight and further improve handling, the tires are roughly 10% lighter than other tires of similar dimensions. The tire's internal structure features twin steel belts reinforced by spirally wound Twaron cord. Twaron is a polyamide cord that offers a lightweight, high-strength reinforcement above the steel belts to enhance high-speed handling, wear and durability. Michelin FAZ Technology (Filament At Zero degrees) winds the Twaron cord around the tire circumference much the same way fishing line is wound onto fishing reels to allow Michelin engineers to tune tension and strength. The polyester casing provides a comfortable ride and responsive handling.
2012 ABS/HCU Replacement
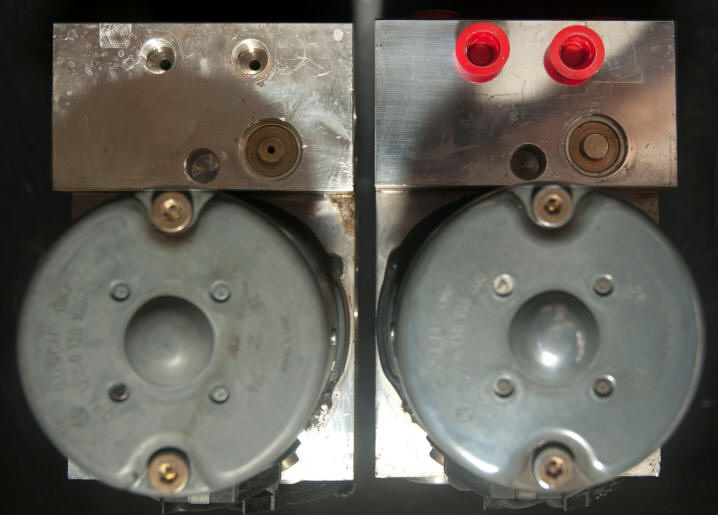
On this car, the ABS Controller and Hydraulic Control unit are screwed together to form a single assembly, which is bolted to the right frame rail, near the front of the engine bay. During the summer of 2012, I began to lose my brakes while driving in traffic one afternoon, and I barely made it home before the pedal was sinking all the way to the floor with every stab. No BRAKE light, no ABS light, but practically no brake bite, either. With the car safely parked in the garage, I mashed the pedal several times in rapid succession, and then looked underneath for the leak, anticipating a puddle of hydraulic fluid below the master cylinder or at one of the wheel cylinders. To my surprise, the puddle was located directly under Taz's Hydraulic Control Unit. I put the Cobra up on stands and inspected the HCU, expecting to find a loose fitting or damaged brake line. Nope. The fluid was coming from behind a round plastic cover on its left side, below the fittings for the right side brake lines. I popped off the plastic cover and discovered a brass plug with - of all things - a weep hole machined into its center. Every time the brake pedal was depressed, a fair amount of hydraulic fluid literally squirted out of that hole. A WEEP HOLE in a high pressure hydraulic system? REALLY??? I'd like to meet the rocket scientist who thought that was a good idea! After diligently attempting to locate a shop, both locally and on the Internet, that would repair or rebuild the HCU, I concluded that no such shop existed, or if one did, I was unable to find it. There are multiple online shops willing to repair the circuitry of the ABS Controller, which is screwed onto the HCU, but everyone appeared to consider the HCU a "black box" with no user serviceable parts. Furthermore, the entire assembly has been discontinued - gee, what a surprise! - relegating me to the used market. I suppose this is just as well, since the damned things ran well over a grand from Ford when new. Luckily I found several of these units for sale on eBay - all with their associated ABS Controllers still attached - for under $300. I settled on one out of a low-mileage 2004 Cobra that was being offered with a 90-day warranty. After the part arrived, I compared it to the original I had removed from Taz. Surprise, surprise!!! Sometime between when my unit and the HCU from the 2004 were manufactured, Ford had eliminated that pesky weep hole. Do you suppose they discovered it was a bad idea? Yep. Do you think it was unconscionable of Ford to correct a defect in a safety-related part without mounting a recall? Yep. (If I had bought a replacement out of another '01, I would never have discovered this change.) In fact, I think it might be considered "criminal negligence" in a court of law. But then, I'm no lawyer. I just know what seems WRONG to me. Anyway, here's a photo of the original unit (on the left) and its replacement side-by-side. To borrow a phrase from the IQ tests, "One of these is not like the other." Incidentally, all other faces of the two units were identical, so it isn't as if that hole had simply been relocated.
If you own a New Edge Cobra, you might take a peek under that black plastic cover on your car's HCU, just to see if you could be in for a similar experience at some point. Also, bear in mind that mine went south after only 25K miles, so your Cobra doesn't need to be a high-mileage car for this problem to occur. If you ever need to buy one, complete ABS/HCU assemblies are available at reasonable prices from eBay vendors. Just make certain you buy the revised design. Although separate rebuilt HCU's, sans ABS Controller, are available from one or two online vendors, they run twice as much as a complete assembly from eBay, and which design you receive if you order one would be a crapshoot. Also, while the availability of rebuilt units implies that someone out there is rebuilding them, good luck discovering who that is. TECH TIP: The HCU contains fluid reservoirs behind normally-closed valves. When you buy a used ABS/HCU module, these reservoirs may or may not contain air. New service units were delivered pre-charged with fluid, but there's no guarantee a used one won't have air inside, instead of brake fluid, and you may not find out until you need your brakes the most. During normal driving, the valves remain closed, and no hydraulic fluid flows through those passages, so you won't know there's air inside until you are forced to perform a panic stop and your brake pedal hits the floor. To ensure you don't end up without brakes in a panic stop situation after replacing the HCU, you should first perform a standard 4-wheel brake bleed, follow that with an "ABS Service Bleed," and finish off with another standard 4-wheel bleed. You will need the use of a specialized scan tool in order to perform the ABS Service Bleed procedure. Very few scan tools have this capability, so you may need the assistance of a shop to accomplish an ABS bleed. I have not disassembled the old unit to see just exactly why it began squirting hydraulic fluid, but I suspect the cause was either a stuck valve or bad solenoid. For now, I am just happy that Taz's ABS/HCU swap was painless and reasonably straightforward, requiring less than an hour, including the initial standard bleed. If I ever become curious enough to perform a post-mortem on the thing, I'll update this section to include what I discover.
Michelin PSS Tire Replacements
With 2013 and 2014 date codes, my first set of PSS tires were aging out by 2021, even though their tread depth was still quite good. With that in mind, I wasn't too heartbroken when I gashed the sidewall of one of the fronts on a parking lot barrier. Although the new Pilot Sport 4S was available in the same sizes by that time, I elected to stick with the PSS as a known quantity with which I had been very pleased. I also decided to replace only the front tires and let the rears go a bit longer. In 2025, I finally replaced the rears with a new pair PSS tires in the same size. Having accumulated only another 600 miles since 2021, the old tires still looked fine and had plenty of tread left, but I had become concerned about the possibility that my insurance company would deny coverage for a tire-related incident, if one were to occur, based on their age. The back tires were 12 years old, after all, and Michelin recommends replacement after 10 years, regardless of apparent condition.
2025 ABS/HCU Replacement
In the spring of 2025, the ABS fault lamp lit up during my usual Sunday morning Cobra drive. A quick visual inspection revealed no loss of hydraulic fluid, but something was definitely amiss. When I attempted to read the fault code with my scan tool, it complained that it was unable to establish communication with the module. I was able to resolve the situation by pulling the ABS fuse from the under-dash panel for a few minutes, but it returned again during a short test drive. I reset the fault again, and hoping that the problem was something cheap and easy, I put the car in the air and checked the realtime data from each of the wheel speed sensors with my scan tool. No issues there. They were all reporting valid data. Next, still hoping for a cheap and easy solution, I began an ABS service bleed, which my scan tool can perform. For those unaware, ABS service bleeds on these cars proceed as follows: LF --> RF --> RR --> LR. The left front bleed completed without a hitch, but communication with the module dropped during the right front bleed, and the fault lamp fired up again. This pointed to a circuit problem inside the module. Availability of new Bosch ABS control modules for these cars was nonexistent, since they had been out of production for decades, and the rough physical appearance of the units that I found on the used market was appalling. Fortuantely, I had scored a brand new unit, complete with HCU, a dozen years earlier, so I replaced the entire ABS/HCU assembly in the car with that, which was able to successfully complete the service bleed procedure after installation. The Cobra has been on the road several times since then, so I feel reasonably confident that the ABS fault issue has been resolved. During my search for a used ABS control unit, I noticed that several local automotive electrical shops offered ABS module rebuilding as one of their services. But these were small Mom-and-Pop operations, and I was reluctant to use one of them. On the other hand, I didn't want to discard the failed module, given the visual shape of the used ones that I had found for sale. Luckily, there are a few companies online that specialize in the troubleshooting and repair of electronic control modules. I opted for a Georgia-based company named UpFix based on many positive Trustpilot reviews, the quality of the company's website, and the professional appearance of the building, which I was able to see using Google Street View. The repair process went smoothly, thanks to the company's shipping service and great communication from start to finish. In less than a week, my repaired module was at my door, complete with a 1-year warranty that I knew I wouldn't need, because I put it on the shelf as a spare after I had reconnected it to its HCU.
|